So, you’ve just got your first tufting gun—exciting, right? 🎉 But before you dive in, there are a few important things you need to know.
Using a tufting gun incorrectly can lead to:
❌ Fabric tearing
❌ Yarn not staying in place
❌ A jammed machine
Don’t worry! This guide will walk you through everything you need to know to use your tufting gun like a pro.
1️⃣ Step 1: Setting Up Your Tufting Gun
📌 What You Need:
✔ A tufting frame with tightly stretched fabric
✔ A tufting gun (Cut Pile or Loop Pile)
✔ High-quality yarn (4-ply or thicker)
✔ Glue (for securing the yarn after tufting)
✔ Scissors and a rug trimmer (for finishing)
📌 How to Prepare Your Workstation:
✅ Mount the fabric tightly on the frame—loose fabric will make tufting difficult.
✅ Check your tufting gun settings—adjust for Cut Pile or Loop Pile mode if using a dual-function gun.
✅ Ensure the yarn flows smoothly—thread it properly to prevent jams.
💡 Pro Tip: Use Primary Tufting Cloth for the best results.
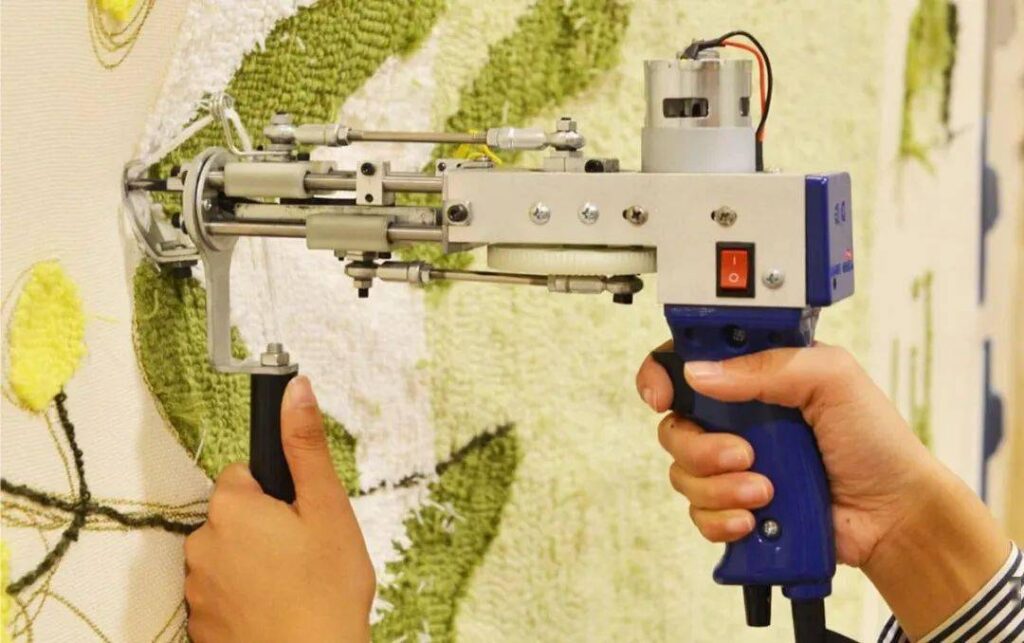
2️⃣ Step 2: How to Use a Tufting Gun
📌 Basic Tufting Technique:
1️⃣ Hold the tufting gun at a 90-degree angle to the fabric.
2️⃣ Gently press the trigger while moving the gun slowly and steadily.
3️⃣ Keep the machine moving to prevent over-tufting in one spot.
4️⃣ Maintain a consistent speed for even tufting and clean design lines.
📌 Common Mistakes to Avoid:
❌ Moving too fast → Uneven yarn loops.
❌ Holding the gun at an angle → Yarn may not stay in place.
❌ Pressing the trigger too hard → Risk of fabric tearing.
💡 Pro Tip: Practice on a scrap piece of fabric before starting a full rug!
3️⃣ Step 3: Fixing Common Tufting Problems
📌 Issue: Yarn Keeps Getting Stuck
✅ Make sure the yarn is not twisted or tangled.
✅ Check if the yarn feeder is clean and not blocked.
📌 Issue: The Machine Is Not Tufting Properly
✅ Adjust the speed settings—going too fast can cause misfires.
✅ Check if the needle is sharp and not worn out.
📌 Issue: Uneven Pile Height
✅ Trim the rug evenly using a rug trimmer or scissors.
✅ Use a tufting brush to fluff up the fibers.
💡 Pro Tip: Regularly clean your tufting gun to avoid a buildup of lint and dust!
4️⃣ Step 4: Finishing & Securing Your Tufted Rug
📌 Securing the Yarn with Glue:
- Apply latex-based glue to the back of your rug to hold the yarn in place.
- Let it dry for 24-48 hours before cutting and finishing.
📌 Trimming & Shaping Your Rug:
- Use sharp scissors for precise cutting.
- An electric rug trimmer helps create an even, polished surface.
💡 Pro Tip: Add a felt or canvas backing for a professional finish!
5️⃣ Safety Tips When Using a Tufting Gun
⚠️ Keep your hands away from the moving needle—a tufting gun moves fast and can cause injury.
⚠️ Always turn off the machine before making adjustments to the yarn or needle.
⚠️ Use in a well-ventilated area when applying glue.
6️⃣ Conclusion – Master Tufting the Right Way!
📌 Quick Recap:
✅ Set up your workspace properly—tight fabric and correct machine settings.
✅ Use slow and steady movements for clean tufting.
✅ Fix common issues like yarn jams or uneven piles.
✅ Secure your rug properly with glue and trimming techniques.
Now, you’re ready to start tufting like a pro! 🚀✨